
A Case Study on the Yocto Project
Building a Barcode Reader From Beginning to End
In this post, it’ll be tried to explain what is Yocto Project by building a real world example - a barcode reader. So let’s start!
Introduction
Following excerpt is taken from the Wikipedia article 1 on the Yocto Project.
The Yocto Project is a Linux Foundation collaborative open source project whose goal is to produce tools and processes that enable the creation of Linux distributions for embedded and IoT software that are independent of the underlying architecture of the embedded hardware. The project was announced by the Linux Foundation in 2010 and launched in March, 2011, in collaboration with 22 organizations, including OpenEmbedded.2
This directly leads us to OpenEmbedded 2 build system. So what is OpenEmbedded and OpenEmbedded build system? Following excerpt is taken from the Wikipedia article 3 on the OpenEmbedded.
OpenEmbedded is a build automation framework and cross-compile environment used to create Linux distributions for embedded devices. The OpenEmbedded framework is developed by the OpenEmbedded community, which was formally established in 2003. OpenEmbedded is the recommended build system of the Yocto Project, which is a Linux Foundation workgroup that assists commercial companies in the development of Linux-based systems for embedded products.
The build system is based on BitBake “recipes”, which specify how a particular package is built but also include lists of dependencies and source code locations, as well as for instructions on how to install and remove a compiled package. OpenEmbedded tools use these recipes to fetch and patch source code, compile and link binaries, produce binary packages (ipk, deb, rpm), and create bootable images.
As can be seen from the above quotes about Yocto Project and OpenEmbedded, they are different from each other. However, they are often used interchangeably. In short;
Yocto is an umbrella project for building your own Linux Embedded distro
OpenEmbedded is a build system for Yocto
OpenEmbedded utilizes the tool BitBake for everthing as can be seen from above excerpt. In the next section, it’ll be tried to explain how to get OpenEmbedded build system BitBake.
How to Prepare the Host System
Due to target system is Linux OS, the BitBake requires a Linux OS as host especially Debian/Ubuntu. A Linux VM On Windows or MacOS, or WSL on Windows can be used as build machine but not recommended due to performance issues and high demand for disk space. In any case, a Linux machine is required even virtual or native one. From now on, we have two options to install the build system on the host Linux machine.
- Directly installing the tools on the host.
- Using Docker to get whole build system.
The later option is used within this tutorial because while the first method mess the host system, the second method provides an isolated system. On Linux, both methods work with same performance because the Docker does not add an additional layer to work. However on Window adn MacOS, the Docker needs an additional Linux VM therefore the performance will be decreased.
From now on, we assume that we have a Debian/Ubuntu Linux Machine (Native or Virtual) and we have an access to machine over SSH console. If you don’t feel comfortable with the console, you can use teh VS Code Remote SSH plugin 4.
For the first method you can follow the document Yocto Project Quick Build 5.
For the second method, the Docker engine needs to be installed first. For this, you can follow the document Install Docker Engine on Debian 6. Also we need the git versioning tools. It can be installed as follow
$ sudo apt-get update
$ sudo apt-get install git
How to Get the OpenEmbedded Build System
Now we have all required base tools on host, and we can get the BitBake from the Poky project as follow
# Create a working directory
$ mkdir -p /mnt/Work/PROJs/rpi/yocto/src
$ cd /mnt/Work/PROJs/rpi/yocto/src

# getting latest stable build system branch kirkstone from yocto project repos
$ git clone https://git.yoctoproject.org/poky -b kirkstone

# return to yocto directory and run docker
$ cd ..
$ docker run --rm -it -v $(pwd):/workspace --workdir /workspace crops/poky:latest

# exit to return host command prompt
$ exit
After the last command was issued, if the container images could not be found on local it will be downlaoded automatically from the Docker Hub and run the container, then you drop into container command line prompt. Now we have a whole build system but no source to build. We will get the sources in next section.
How to Get the BitBake Layers
In BitBake concept, every group of source provides same functionality is called as Layer or Meta-Layer. Indeed, they are not a regular source code to build. They are some script in BitBake language that defines how to get sources, patch them, build them, their dependencies, and integrate into final target image. We need following Layers for our project.
- meta-extra - a custom layer to add a regular sudo user
- meta-raspberrypi - the RPI board support package
- meta-openembedded - additional Linux tools
- meta-virtualization - the Docker support packages
The sources can be downloaded from relevant locations as follow
# goto source folder
$ cd /mnt/Work/PROJs/rpi/yocto/src

# meta-extra
$ git clone https://github.com/ierturk/yocto-meta-extra.git -b kirkstone meta-extra

# meta-raspberrypi
$ git clone https://git.yoctoproject.org/meta-raspberrypi -b kirkstone

# meta-openembedded
$ git clone https://git.openembedded.org/meta-openembedded -b kirkstone

# meta-virtualization
$ git clone https://git.yoctoproject.org/meta-virtualization -b kirkstone
Now we have all the source to build the target image.
Configuring and Building Target Image
Our target images will be used for developing, it will have lots of tools which will not have an productions image, therefore it will be larger then a production image. However we will follow a different appraching to develop an application. We will use the Docker for the applications and all the required packages which are not included in base image will be included within the Docker containers.
Now we can start to configure and build the image
# goto yocto directory and run Docker
$ cd /mnt/Work/PROJs/rpi/yocto/src
$ docker run --rm -it -v $(pwd):/workspace --workdir /workspace crops/poky:latest

# We will drop into container command promt.
# Now the directory /mnt/Work/PROJs/rpi/yocto/src will be mounted
# as /workspace within the container, and we are in this directory.

# Following command start a new build directory,
# and automatically drop into build directory
$ . src/poky/oe-init-build-env
### Shell environment set up for builds. ###

You can now run 'bitbake <target>'

Common targets are:
    core-image-minimal
    core-image-full-cmdline
    core-image-sato
    core-image-weston
    meta-toolchain
    meta-ide-support

You can also run generated qemu images with a command like 'runqemu qemux86'

Other commonly useful commands are:
 - 'devtool' and 'recipetool' handle common recipe tasks
 - 'bitbake-layers' handles common layer tasks
 - 'oe-pkgdata-util' handles common target package tasks
Then you should have a following directory tree under the directory yocto.
|-- build
|   |-- conf
|   |   |-- bblayers.conf
|   |   |-- local.conf
|   |   `-- templateconf.cfg
`-- src
    |-- meta-extra
    |-- meta-openembedded
    |-- meta-raspberrypi
    |-- meta-virtualization
    `-- poky
Now we need to edit the files bblayers.conf and local.conf. They are created with the contents, and needs to be applied following patches.
The patch for bblayers.conf
diff initial/bblayers.conf final/bblayers.conf
11a12,19
>   ${TOPDIR}/../src/meta-raspberrypi \
>   ${TOPDIR}/../src/meta-openembedded/meta-oe \
>   ${TOPDIR}/../src/meta-openembedded/meta-multimedia \
>   ${TOPDIR}/../src/meta-openembedded/meta-networking \
>   ${TOPDIR}/../src/meta-openembedded/meta-python \
>   ${TOPDIR}/../src/meta-openembedded/meta-filesystems \
>   ${TOPDIR}/../src/meta-virtualization \
>   ${TOPDIR}/../src/meta-extra \
The patch for local.conf
diff initial/local.conf final/local.conf
36a37,38
> MACHINE ?= "raspberrypi3-64"
> #
108c110
< PACKAGE_CLASSES ?= "package_rpm"
---
> PACKAGE_CLASSES ?= "package_ipk"
276a279,344
>
> # IMAGE_ROOTFS_EXTRA_SPACE = "16777216"
>
> # Systemd enable
> DISTRO_FEATURES:append = " systemd"
> VIRTUAL-RUNTIME_init_manager = "systemd"
> DISTRO_FEATURES_BACKFILL_CONSIDERED = "sysvinit"
> VIRTUAL-RUNTIME_initscripts = ""
>
> # Extra Users
> DISTRO_FEATURES:append = " pam"
> IMAGE_INSTALL:append = " extra-sudo"
> IMAGE_INSTALL:append = " extra-user"
>
> # Image features
> IMAGE_FEATURES:append = " hwcodecs bash-completion-pkgs"
>
> # Kernel Modules All
> # IMAGE_INSTALL:append = " kernel-modules"
> # IMAGE_INSTALL:append = " linux-firmware"
>
> # OpenGL
> DISTRO_FEATURES:append = " opengl"
>
> # Dev Tools
> IMAGE_FEATURES:append = " tools-debug"
> EXTRA_IMAGE_FEATURES:append = " ssh-server-openssh"
>
> # Virtualization
> DISTRO_FEATURES:append = " virtualization"
> IMAGE_INSTALL:append = " docker-ce"
> IMAGE_INSTALL:append = " python3-docker-compose"
> IMAGE_INSTALL:append = " python3-distutils"
>
> # Network manager
> IMAGE_INSTALL:append = " wpa-supplicant"
> IMAGE_INSTALL:append = " networkmanager"
> IMAGE_INSTALL:append = " modemmanager"
> IMAGE_INSTALL:append = " networkmanager-nmcli"
> IMAGE_INSTALL:append = " networkmanager-nmtui"
>
> # USB Camera
> IMAGE_INSTALL:append = " kernel-module-uvcvideo"
> IMAGE_INSTALL:append = " v4l-utils"
>
> # RPi
> ENABLE_UART = "1"
>
> # Date Time Daemon
> # IMAGE_INSTALL:append = " ntpdate"
>
> # Tools
> IMAGE_INSTALL:append = " git"
> IMAGE_INSTALL:append = " curl"
> IMAGE_INSTALL:append = " wget"
> IMAGE_INSTALL:append = " rsync"
> IMAGE_INSTALL:append = " sudo"
> IMAGE_INSTALL:append = " nano"
> IMAGE_INSTALL:append = " socat"
> IMAGE_INSTALL:append = " tzdata"
> IMAGE_INSTALL:append = " e2fsprogs-resize2fs gptfdisk parted util-linux udev"
>
> # VS Code reqs
> IMAGE_INSTALL:append = " ldd"
> IMAGE_INSTALL:append = " glibc"
> IMAGE_INSTALL:append = " libstdc++"
Now just type following command and then you need to wait some quite considerable time to get the target image.
$ bitbake core-image-base
Flashing the Image
You will find the image as build/tmp/deploy/images/raspberrypi3-64/core-image-base-raspberrypi3-64.wic.bz2. The image can be flashed as follow in a Unix system.
# Unzip image
$ bzip2 -d -f ./core-image-base-raspberrypi3-64.wic.bz2

# Flash to SD Card
# Here you need to change sdX with your SD Card reader device.
$ sudo dd if=./core-image-base-raspberrypi3.wic of=/dev/sdX bs=1m
The First Run
Finally you have an SD Card has RPI3-64 bit OS image. Just plug into your RPI3, then power up. If you already know your RPI IP address you can login as root without password over SSH console, or with the user ierturk wit the defult password 1200. At first login the system request to change password for the user ierturk. This user also is a sudo user.
Additional Tune Up
For retain the image size to be smaller and fits to any SD Card, the root file system was retained as small as possible. Now it needs to be expanded as follow.
# login as root user over SSH
$ ssh root@ip_address_of_the_rpi

# following command list your memory blocks
$ lsblk
NAME        MAJ:MIN RM  SIZE RO TYPE MOUNTPOINTS
mmcblk0     179:0    0  XXXG  0 disk
|-mmcblk0p1 179:1    0 69.1M  0 part /boot
`-mmcblk0p2 179:2    0   XXG  0 part /

# here mmcblk0p2 needs to be expanded to its max
$ parted /dev/mmcblk0 resizepart 2 100%
$ resize2fs /dev/mmcblk0p2

# then it looks like as follow
$ lsblk
NAME        MAJ:MIN RM  SIZE RO TYPE MOUNTPOINTS
mmcblk0     179:0    0 29.1G  0 disk
|-mmcblk0p1 179:1    0 69.1M  0 part /boot
`-mmcblk0p2 179:2    0   29G  0 part /
Finally everything is OK. Now type following command to test your Docker installation
$ docker info
Client:
 Context:    default
 Debug Mode: false

Server:
 Containers: 0
  Running: 0
  Paused: 0
  Stopped: 0
 Images: 2
 Server Version: 20.10.12-ce
 Storage Driver: overlay2
  Backing Filesystem: extfs
  Supports d_type: true
  Native Overlay Diff: true
  userxattr: false
 Logging Driver: json-file
 Cgroup Driver: cgroupfs
 Cgroup Version: 1
 Plugins:
  Volume: local
  Network: bridge host ipvlan macvlan null overlay
  Log: awslogs fluentd gcplogs gelf journald json-file local logentries splunk syslog
 Swarm: inactive
 Runtimes: io.containerd.runc.v2 io.containerd.runtime.v1.linux runc
 Default Runtime: runc
 Init Binary: docker-init
 containerd version: d12516713c315ea9e651eb1df89cf32ff7c8137c.m
 runc version: v1.1.2-9-gb507e2da-dirty
 init version: b9f42a0-dirty
 Kernel Version: 5.15.34-v8
 Operating System: Poky (Yocto Project Reference Distro) 4.0.2 (kirkstone)
 OSType: linux
 Architecture: aarch64
 CPUs: 4
 Total Memory: 909MiB
 Name: raspberrypi3-64
 ID: SKCZ:5JOV:CLCE:ECSC:UJ46:VGCH:YAFW:TNOF:J3FN:WO26:FHIO:BHRR
 Docker Root Dir: /var/lib/docker
 Debug Mode: false
 Registry: https://index.docker.io/v1/
 Labels:
 Experimental: false
 Insecure Registries:
  127.0.0.0/8
 Live Restore Enabled: false

WARNING: No memory limit support
WARNING: No swap limit support
WARNING: No kernel memory TCP limit support
WARNING: No oom kill disable support
WARNING: No blkio throttle.read_bps_device support
WARNING: No blkio throttle.write_bps_device support
WARNING: No blkio throttle.read_iops_device support
WARNING: No blkio throttle.write_iops_device support
Now we have a base system without any Desktop to develop an application using Docker.
Developing a Simple Barcode Reader Application using the Docker Containers and Docker Compose without Modifying the Base System
We’ll use two Docker container for the application as follow
- Window manager with VNC support as wayland server
- Application server as wayland client
Now we need to build them. For this purpose, the container images can be built locally by using the Docker build 7 or for multiple architecture by using the Docker buildx 8.
In this tutorial, we’ll follow another approacging for building the containers. We’ll use GitHub actions to build and push the containers to the HubDocker automatically as CI/CD. We need a recipe file which is called Dockerfile to build a container image. The Alpine Linux 9 is used for the containers to get smaller container images here. Following Dockerfile is for the container that contains a windows manager SwayWm 10 (a wayland compositor) with VNC support. It’s just looks like a bash script.
# Dockerfile SwayWM
ARG ALPINE_VERSION=3.16
FROM alpine:${ALPINE_VERSION}

ENV USER="vnc-user" \
    APK_ADD="mesa-dri-swrast openssl socat sway xkeyboard-config" \
    APK_DEL="bash curl" \
    VNC_LISTEN_ADDRESS="0.0.0.0" \
    VNC_AUTH_ENABLE="false" \
    VNC_KEYFILE="key.pem" \
    VNC_CERT="cert.pem" \
    VNC_PASS="$(pwgen -yns 8 1)"

RUN apk update \
    && apk upgrade

# Add packages
RUN apk add --no-cache $APK_ADD

# Add fonts
RUN apk add --no-cache msttcorefonts-installer fontconfig \
    && update-ms-fonts

# Add application user
RUN addgroup -g 1000 $USER && adduser -u 1000 -G $USER -h /home/$USER -D $USER

# Iinstall vnc packages
RUN apk add --no-cache wayvnc neatvnc

# Copy sway config
COPY assets/swayvnc/config /etc/sway/config
COPY assets/swayvnc/kms.conf /etc/kms.conf

# Add wayvnc to compositor startup and put IPC on the network
RUN mkdir /etc/sway/config.d \
    && echo "exec wayvnc 0.0.0.0 5900" >> /etc/sway/config.d/exec \
    && echo "exec \"socat TCP-LISTEN:7023,fork UNIX-CONNECT:/run/user/1000/sway-ipc.sock\"" >> /etc/sway/config.d/exec \
    && mkdir -p /home/$USER/.config/wayvnc/ \
    && printf "\
address=$VNC_LISTEN_ADDRESS\n\
enable_auth=$VNC_AUTH_ENABLE\n\
username=$USER\n\
password=$VNC_PASS\n\
private_key_file=/home/$USER/$VNC_KEYFILE\n\
certificate_file=/home/$USER/$VNC_CERT" > /home/$USER/.config/wayvnc/config

# Generate certificates vor VNC
RUN openssl req -x509 -newkey rsa:4096 -sha256 -days 3650 -nodes \
	-keyout key.pem -out cert.pem -subj /CN=localhost \
	-addext subjectAltName=DNS:localhost,DNS:localhost,IP:127.0.0.1

# Add entrypoint
USER $USER
COPY assets/swayvnc/entrypoint.sh /
ENTRYPOINT ["/entrypoint.sh"]
And following YML file is for Github Action. With these files, you’ll get Dockar container images on DockerHub with three architecture (linux/amd64, linux/arm64, linux/arm/v7).
name: Alpine SwayVnc

on:
  push:
    branches:
      - master

jobs:
  docker:
    runs-on: ubuntu-latest
    steps:
      -
        name: Checkout
        uses: actions/checkout@v3
      -
        name: Docker meta
        id: meta
        uses: docker/metadata-action@v4
        with:
          images: |
            ierturk/alpine-swayvnc
          tags: |
            type=raw,value={{date 'YYYYMMDD-hhmm'}}
      -
        name: Set up QEMU
        uses: docker/setup-qemu-action@v2
      -
        name: Set up Docker Buildx
        uses: docker/setup-buildx-action@v2
      -
        name: Login to DockerHub
        uses: docker/login-action@v2
        with:
          username: ${{ secrets.DOCKER_HUB_USERNAME }}
          password: ${{ secrets.DOCKER_HUB_ACCESS_TOKEN }}
      -
        name: Build and push
        uses: docker/build-push-action@v3
        with:
          context: ./Alpine
          file: ./Alpine/swayvnc.Dockerfile
          platforms: linux/amd64, linux/arm64, linux/arm/v7
          push: true
          tags: ${{ steps.meta.outputs.tags }}, ierturk/alpine-swayvnc:latest
          labels: ${{ steps.meta.outputs.labels }}
          cache-from: type=registry,ref=ierturk/alpine-swayvnc:latest
          cache-to: type=inline
      -
        name: Image digest
        run: echo ${{ steps.docker_build.outputs.digest }}
All the sources can be found on the relevant GitHub repo 11. All required containers will be also built then pushed by this repo using GitHub actions. Now the containers is ready for using on DockerHub 12. Now it can be typed following line to run the container, and can be connected to Desktop SwayWM by a VNC Viewer 13.
$ export LISTEN_ADDRESS="0.0.0.0"; docker run -e XDG_RUNTIME_DIR=/tmp \
             -e WLR_BACKENDS=headless \
             -e WLR_LIBINPUT_NO_DEVICES=1 \
             -e SWAYSOCK=/tmp/sway-ipc.sock
             -p${LISTEN_ADDRESS}:5900:5900 \
             -p${LISTEN_ADDRESS}:7023:7023 ierturk/alpine-swayvnc
Then you’ll see your Desktop for the first time. This is not a regular Desktop but a lightweight one.

However, it is not a proper way to start containers by typing a long commandline. Fortunately there is another tool for doing this with more convenient way. We’ll use to run containers by using the tool Docker-Compose 14. The Docker-Compose uses a YML file to run the containers. This is another recipe to run multiple containers at once. It looks like as follow
version: '2.4'

services:
  swayvnc:
    image: ierturk/alpine-swayvnc:latest
    volumes:
      - type: bind
        source: /tmp
        target: /tmp
      - type: bind
        source: /run/user/1000
        target: /run/user/1000
      - type: bind
        source: /dev
        target: /dev
      - type: bind
        source: /run/udev
        target: /run/udev
      - type: bind
        source: ../..
        target: /workspace
    cap_add:
      - CAP_SYS_TTY_CONFIG
    # Add device access rights through cgroup...
    device_cgroup_rules:
      # ... for tty0
      - 'c 4:0 rmw'
      # ... for tty7
      - 'c 4:7 rmw'
      # ... for /dev/input devices
      - 'c 13:* rmw'
      - 'c 199:* rmw'
      # ... for /dev/dri devices
      - 'c 226:* rmw'
      - 'c 81:* rmw'
    entrypoint: /entrypoint.sh
    network_mode: host
    privileged: true
    environment:
      - XDG_RUNTIME_DIR=/run/user/1000
      - WLR_BACKENDS=headless
      - WLR_LIBINPUT_NO_DEVICES=1
      - SWAYSOCK=/run/user/1000/sway-ipc.sock

  app:
    image: ierturk/alpine-dev-qt:latest
    security_opt:
      - seccomp:unconfined
    shm_size: '256mb'
    volumes:
      - type: bind
        source: /tmp
        target: /tmp
      - type: bind
        source: /run/user/1000
        target: /run/user/1000
      - type: bind
        source: /dev
        target: /dev
      - type: bind
        source: /run/udev
        target: /run/udev
      - type: bind
        source: ../..
        target: /workspace
      # - type: bind
      #   source: ~/.ssh
      #   target: /home/ierturk/.ssh
      #   read_only: true
    cap_add:
      - CAP_SYS_TTY_CONFIG
      - SYS_PTRACE
    # Add device access rights through cgroup...
    device_cgroup_rules:
      # ... for tty0
      - 'c 4:0 rmw'
      # ... for tty7
      - 'c 4:7 rmw'
      # ... for /dev/input devices
      - 'c 13:* rmw'
      - 'c 199:* rmw'
      # ... for /dev/dri devices
      - 'c 226:* rmw'
      - 'c 81:* rmw'
    stdin_open: true
    tty: true
    network_mode: host
    privileged: true
    environment:
      - WAYLAND_USER=ierturk
      - XDG_RUNTIME_DIR=/run/user/1000
      - WAYLAND_DISPLAY=wayland-1
      - DISPLAY=:0
      - QT_QPA_PLATFORM=wayland
      - QT_QPA_EGLFS_INTEGRATION="eglfs_kms"
      - QT_QPA_EGLFS_KMS_ATOMIC="1"
      - QT_QPA_EGLFS_KMS_CONFIG="/etc/kms.conf"
      - IGNORE_X_LOCKS=1
      - QT_IM_MODULE=qtvirtualkeyboard
    user: ierturk
    working_dir: /workspace
    depends_on:
      - swayvnc
There are two services definition here. One of them for Display manager and the other one is for the application. Now it can be just typed as follow for everything ups an running.
$ docker-compose -f Alpine/swayvnc-dc.yml up -d
Creating alpine_swayvnc_1 ... done
Creating alpine_app_1     ... done
Now they are all up and running and connected to each other and the base system resources. From now on, we can login to app container as follow
$ docker exec -it alpine_app_1 ash
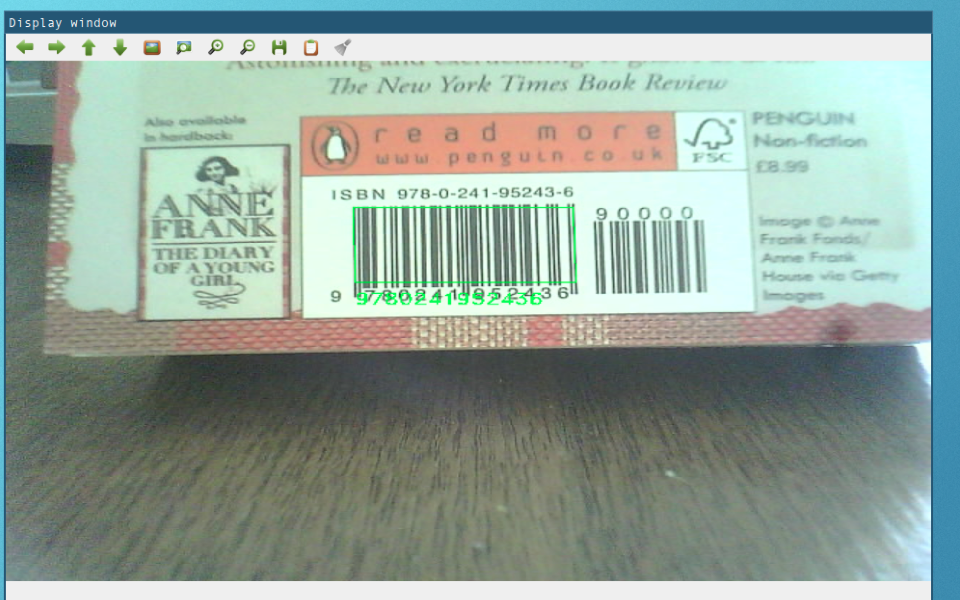
And we can run any arbitrary application here, we’ll try a Barcode Reader - ZXing-C++ 15. For sample UI we’ll use OpenCV 16 and Qt5 - QuickControl 2 17 (QML Types) and a USB Camera. The Barcode Reader Library sources can be downloaded and build by CMake 18 as follow
$ git clone https://github.com/nu-book/zxing-cpp.git

# then go into zxing-cpp directory and craete a build folder
$ cd zxing-cpp
$ mkdir build
$ cd build
$ cmake ..
$ make

# then run the application
$ ./example/ZXingOpenCV
You may get some screen looks like following images

If everthing went well we can exit the container commandline, the shut down all the containers as follow
# close app application
# just press CTRL-C
$ exit
$ docker-compose -f Alpine/swayvnc-dc.yml down
Stopping alpine_app_1     ... done
Stopping alpine_swayvnc_1 ... done
Removing alpine_app_1     ... done
Removing alpine_swayvnc_1 ... done
Therefore, there will be nothing left, the containers will be stopped and deleted.
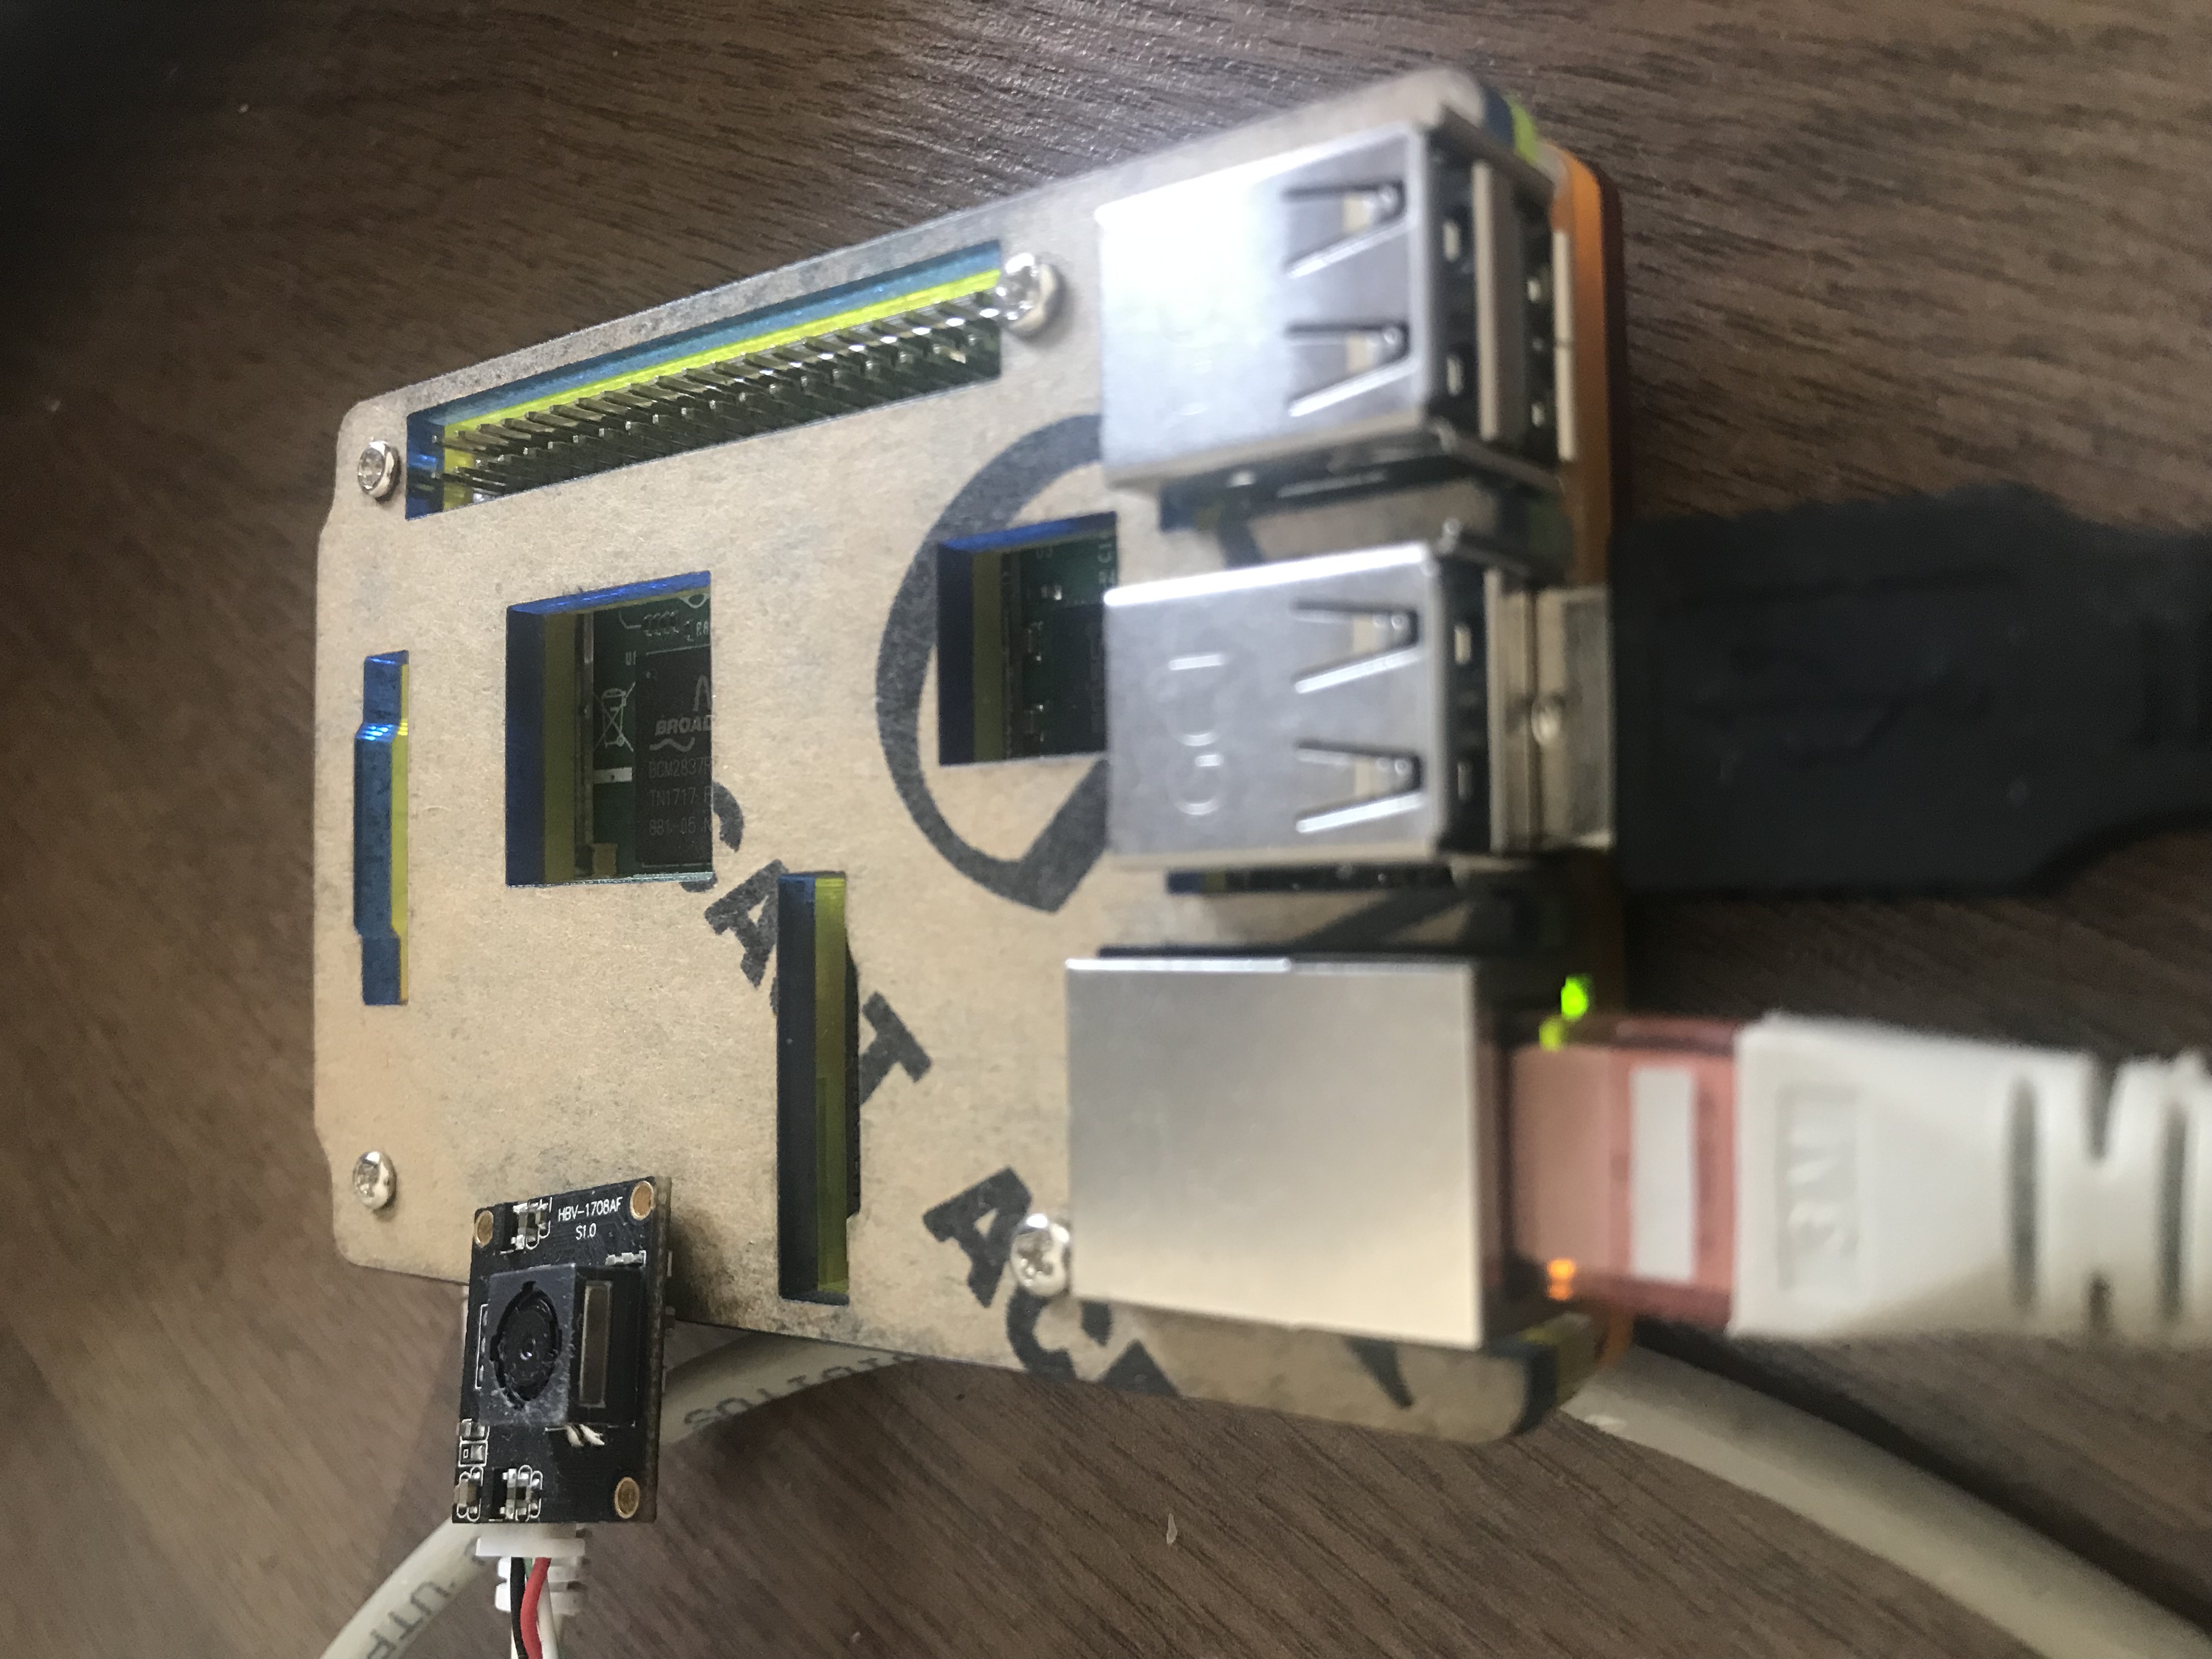
And finally this my RPI3 with a USB Camera.
Conclusion
Until now, we developed the whole system from scratch. And it woks as you can see. Yo can work on this and modify some parts according to your requirements.
Hope you enjoyed with the tutorial, found useful. Thank you for reading.